A few years ago, the web at large was unencrypted. HTTPS was reserved for only the most critical sections of a web page. The consensus was only sensitive user data needed to be encrypted; public parts of a web page were okay to send in the clear.
Well, things are different now. Today we know it’s not a good idea for any web traffic to be unencrypted, and anyone running a website, no matter the content, should configure a strong HTTPS setup today.
Embarrassingly, my own website has not supported HTTPS at all for almost two years1.
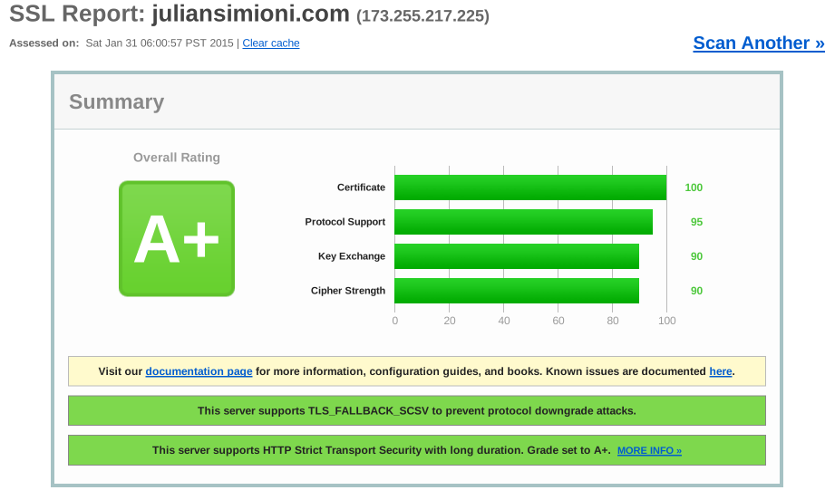
Eric Mill’s fantastic Switch to HTTPS Now, For Free finally gave me the kick in the pants I needed, and over the holidays I spent the time to set up HTTPS and tweak the configuration to achieve an A+ on the Qualys SSL Report.
It took a good amount of research, but I’ve settled on a close to optimal setup, and want to share how I’ve achieved it on Nginx. Besides the actual configuration, I’ve included explanations of what all the components of a secure setup do, and why it’s the best option.
This is part 1, where we’ll talk about basics and deal with setting up certificates.
Part 2 covers more Nginx configuration, especially ciphersuite setup.
Initial Setup: Use a Self-Signed Certificate
Simply enabling HTTPS requires very little: a server needs an encryption key and a certificate file. Both of these can be generated quickly and easily on any machine with OpenSSL installed.
While these self-signed certificates don’t provide any true security2 its worth the time to set one up up before moving onto a real certificate to get a feel for the process and fix as many issues as possible early on.
There are far too many tutorials already on generating self-signed certs, so I won’t go into a huge amount of detail here. A simple command like the following will suffice:
1 2 3 | |
The Nginx configuration section for basic SSL3 is also straightforward. Just add the following configuration to your nginx file:
1 2 3 4 5 6 7 8 9 10 | |
(Both code snippets above adapted from the Linode certifficate guide, also linked above. It’s one of the best)
Now armed with a valid certificate, restarting Nginx should allow your website to load over HTTPS, although it will probably greet you with a nasty warning because the certificate is self-signed. It’s time to do a few initial checks for critical features before we dive in with a full certificate.
Check for a Modern Version of OpenSSL
The OpenSSL library is the almost ubiquitous SSL and TLS library, and its used by nearly every web server, including Nginx. If your version of OpenSSL is out of date, it might have one of any number of security vulnerabilities.
The worst of these is, of course, Heartbleed, which potentially allows leaking all sorts of data including your webservers private keys. Heartbleed was first made public in April 2014, but many websites are still vulnerable. Don’t be one of them.
Check the OpenSSL website for the latest stable version, and then check yours like this:
1 2 | |
Ensure You’ve Created a 2048-bit, SHA256-signed Certificate
Self signed certificates can be easily regenerated with no cost or downtime, so its best to iron out certificate configuration issues now. Revoking even a free StartSSL certificate costs $25, so mistakes later on are more costly and time consuming.
The most important certificate configuration setting is the fingerprint hashing algorithm. Until recently, most certificates were signed using SHA1. However, Google, Microsoft, and security researchers in general are now pushing hard to deprecate SHA1 quickly: its becoming dangerously insecure as computing power advances. In its place, new certificates should be signed using SHA256.
There are no known attacks against SHA1 yet, but both Chrome and Firefox will soon show warnings or errors for certificates signed with SHA1, so creating a new certificate today without using SHA256 is a big mistake.
Likewise, a 2048-bit RSA key size is currently optimal4. 1024-bit certificates are well into the realm where someone with a sufficiently powerful computer network could break them. Again, browsers are now actively discouraging their use: Mozilla has removed 1024-bit Certificate Authority keys from the list of trusted certificates starting in Firefox 32, released in September 2014.
If you used the commands above to generate your self-signed certificate, it should already use SHA256 and a 2048 bit RSA key, but the following commands can be used to check:
1 2 3 4 5 | |
(Adapted from this ServerFault Answer)
If it shows sha1WithRSAEncryption or (1024 bit) instead, go back and
regenerate your certificate with the correct settings.
Check for Mixed-Content Warnings
At this point, there’s a very good chance some resources on your website, like Javascript, CSS, or images, are still being loaded over HTTP, even when the initial request is made over HTTPS.
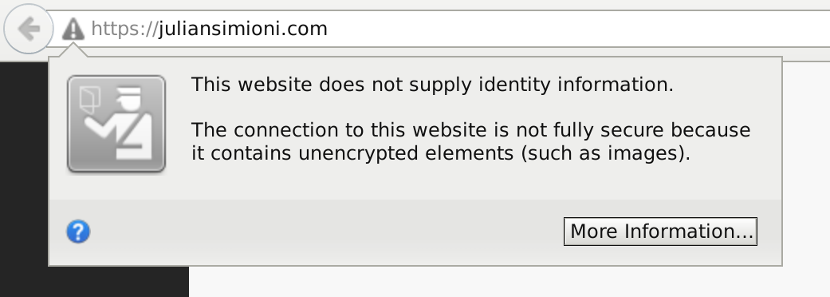 An example of a mixed-content warning in Firefox
It used to be considered enough to use HTTPS only for critical sections of a website, such as a login page and form submissions, but no longer. Modern browsers block the more dangerous varieties of mixed contact (namely Javascript and CSS files).
This has a tremendous security benefit to users, because those files can potentially be modified while in transit and cause serious harm: sensitive user information can be stolen, or malware added to their system.
Fixing mixed-content warnings is very specific to your website’s code, but
in principal it simply involves changing any links that start with http:// to
https://. This includes links to any resources loaded from other servers. If
those servers don’t support HTTPS yet, you have to get rid of the resource
entirely or host it yourself, if possible.
If you really need to support both HTTP and HTTPS, protocol-relative URLs can help, but are discouraged.
Doing it For Real: Use a CA-signed Certificate
Now that these basic issues are tackled, it’s time to create a certificate that browsers will recognise as trusted. This can be a lengthy process for a couple of reasons, so let’s cover the prerequisites first. You’ll need:
- An account with a Certificate Authority.
- Access to
webmaster@yourdomain.com,postmaster@yourdomain.comor whichever email is listed in the SOA record of your domain’s DNS entry. - A certificate request(CSR) file.
Step 1 is potentially a little more cumbersome than signing up for an average website, which is understandable considering the security concerns, but should be manageable. If you haven’t chosen a certificate authority, StartSSL is excellent, and free. Paid options include Verisign and Comodo. Please don’t use GoDaddy.
Step 2 won’t be covered here in detail as it’s highly specific to your DNS setup. If you don’t already have this set up properly, it can take a few hours for the DNS entries to take effect once you’ve made the change, so get started now.
However, if, like me, you are using Fastmail for email from your domain, then they have already set up everything for you. If you aren’t using Fastmail, they are awesome and I can’t recommend them enough.
Once you’ve completed steps 1 and 2, you can create the CSR. This file details what domain you want a certificate for, and any options. Some Certificate Authorities will offer to “help” you by generating a private key and CSR for you in the browser. Decline their offer, since we’ve already generated a private key, and we don’t need that potential breach of security.
The following command will generate a nice CSR for you:
1
| |
Paste that into the form for the CSR on your CA’s webpage, and they will send
back a certificate. Keep it safe and store it on your server, somewhere like
/etc/nginx/ssl/yourwebsite.com.crt.
If you happen to be using StartSSL, Erik Mill’s tutorial which I linked to above walks through every step perfectly!
Initially, you can simply point Nginx at the new key and crt file from your CA just like you did your self-signed cert and things should work5. Congratulations! Your web server is now running TLS with a valid certificate.
If you were to run the SSL Labs test on your website right now, you’d probably see something like this:
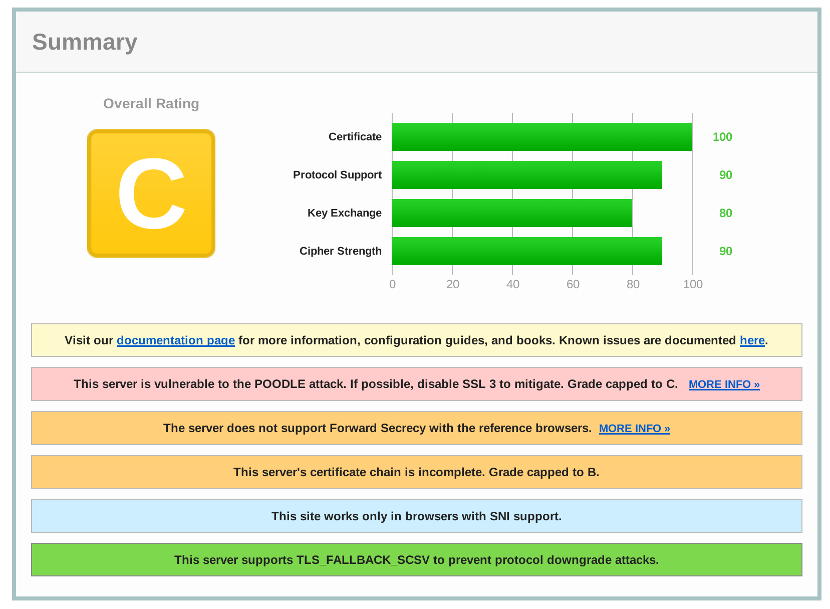
It’s not bad, but the default Nginx settings only get you to a C grade - barely passing. In the next part we’ll look at what it takes to configure Nginx so that you achieve an A+ rating. Stay tuned!
- My server didn’t even respond to HTTPS, or anything on port 443, for this entire time! ⏎
-
For truly secure communication, three things are needed: verification the
message came from who you thought it did (authentication), obfuscation of the
message contents so that no one but the intended recipient can read the message
(encryption), and a way to verify that the message was not changed while in
transit (message digest). A self-signed certificate doesn’t provide any
authentication, so it’s mostly useless.
The Wikipedia page on TLS provides an excellent overview of how this all works. ⏎
- When I say SSL, I really mean TLS. Both SSL and TLS share the same heritage. TLS is simply the name for newer versions. All versions of SSL are now out of date, but the name has stuck. ⏎
- 4096 bit keys are, at this point, considered excessive except for Certificate Authorities, so 2048 is the best size. Remember, a 2048 bit key is not twice as secure as a 1024 bit key, it’s 21024 times as secure! It is twice as slow however. 2048 bits is going to be enough for quite some time, so 4096 bit keys just make the encryption process slower. ⏎
- Initially, you will probably get an OCSP error (looks like this). This will go away in a few hours. The Online Certificate Status Protocol (OCSP) is a system for determining if a certificate has been revoked. Since your certificate is brand new, there’s no information in the system confirming your certificate is still valid, and it will take a little while to get there. We’ll learn more about OCSP in the next post. ⏎